
A while back some friends of mine were flipping a house. There were a few pieces of furniture that had been left behind in the basement of the house and they told me I could have them if I wanted to haul them away. One of the pieces was this old desk.
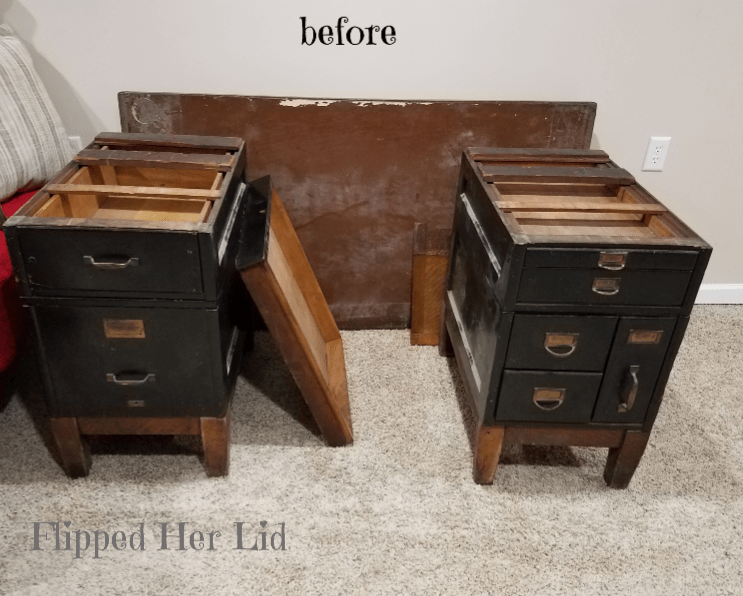
As soon as I saw this desk though, I knew I wouldn’t want to sell it, I would be keeping it for myself! I didn’t get a “before” pic with the top on (shown against the wall) because it was too heavy to lift by myself! When we carried it out I was amazed to discover that it broke down into several sections. That was a good thing because the top is solid wood and weighs a ton! The drawer sections came apart into 3 pieces each. I did a little research and found a similar desk on Pinterest labeled Globe Wernicke Stackable File I couldn’t find any manufacturer name on my desk but it looks very much like those.

I love the front edge of the desktop, I left a lot of the old black paint on it for a really beat up vintage look! I couldn’t wait to stack all of the drawer sections together after it was painted and start taking the pictures! You’ll see Cowboy, my kitty, in several of the pictures. He is always in my business and constantly underfoot! I’m sure he probably wonders what the human has drug home now!
The desktop includes a center drawer and a back piece that fits between the two drawer sections to keep the top from sliding. In the photo below you can see there are wooden writing boards on each side of the center drawer that can slide out for extra space when needed.


I used some vintage envelopes, paper clips, pencils, and paper that were left inside the desk to stage the photos. I found this old metal sectioned drawer at the flea market and thought it was just perfect to hold my vintage paper clips!
This desk wasn’t without its challenges though. One of the front legs was broken and the bottoms of some of the drawers were in pretty bad condition. The desktop was covered with veneer that was topped with a layer of brown vinyl. The brown vinyl removed easily in one piece as well as a black fabric layer beneath. The double layer of veneer underneath that is another story altogether…


This was my first attempt at removing veneer and I was determined to make it happen. I had visions of a stained wood desktop with the painted drawers beneath. I read tips from some of my favorite furniture bloggers, watched a few Youtube videos on removing veneer, and decided to give it a try! Some of the veneer around the edges was already peeling and lifted easily to be chipped away but most of it was glued down tight and wouldn’t budge! I was worried I would damage the wood underneath if I kept hacking at it so I tried using a heat gun. It definitely didn’t go as easily as some of those videos I watched! What finally worked for me was heating small sections, then turning off the heat gun and use a hammer to tap a putty knife under the heated section. I spent several nights of hard work (my shoulder is still paying the price), heating, tapping, and scraping that veneer off.
Once the wood desktop was revealed I could see why they covered it with veneer. There were a few deep gouges in the top and on the two ends where the wood grain runs vertically rather than horizontal, it appeared to have some dry-rot. I was extremely disappointed, especially considering how much effort I’d put into revealing it. I sanded it down, filled the holes and dry rot areas in with wood filler and figured I was going to have to cover it with paint. Just for the heck of it, I decided to apply some antiquing wax to see what it would look like. To my surprise, it didn’t look too bad. Since I had my heart set on a wood-stained top I went ahead and finished the antiquing, then lightly sanded with a 400 grit paper. I actually really like the imperfect, rustic look so I decided it would work for me!

Cleaning the drawer sections was almost as much work as removing the veneer. I have never seen such a filthy piece of furniture! The desk was caked with black dust and also had that sour, musty, antiquey smell to it… blek! I hoped a thorough cleaning and a few coats of paint would get rid of it and luckily it did.
Removing the hardware was not an easy task either! Those screws hadn’t budged in a half-century and they were so tiny that none of my screwdrivers would fit the tiny straight-edge slot in the top of the screws. I sprayed them with WD40 and let them sit for a few hours and then I ended up using the tip of a butter knife to finally break them loose.
After making some minor repairs to the drawers and legs it was finally time to paint. I love watching an old piece of furniture transform as I begin painting! I chose a satin finish, latex paint in a dark grey color called Tomcat for the drawer sections and legs. The inside of the drawers got two coats of an off-white chalk paint called French Linen. I painted the hardware with Rustoleum Metallic Accents in Bronze Medal which was close to the original color of the hardware but just a fresher version.

I found the industrial-look office chair at Walmart.
This was really a fun project, mostly because I knew I was getting a new (old) desk! Thank you to my friends for the free furniture!
Products used:
- Valspar Tomcat satin finish
- Home Decor Chalk in French Linen
- Rustoleum Metallic Accents in Bronze Medal
- Waverly wax in Antique (for desktop)
Thanks for stopping by and don’t forget to let me know what you think!

So neat! Look forward to seeing it in person!
LikeLike