
I recently purchased three of these plain rustic cabinet doors at Country Fair Mall, which is an indoor flea market where I rent a booth to sell my furniture. This type of project is a quick flip with very little cost to me other than my time. It helps fill in space on the walls and shelves in my booth since most of my items are furniture that sits on the floor.
I simply stenciled a design on each door and added knobs or hooks to make some cute rustic signs which have been quick sellers for me in the past. Just before the pandemic hit, I had made a couple of old transom windows into signs. One of them said, ” It’s so good to be home”. Luckily it sold right before everybody had to shelter in place. I’m thinking that won’t be a popular sign again for quite a while! 😂
So, here’s what I did with the cabinet doors…


I sold two of them but no one seemed interested in the “All you need is love” sign. Maybe I should repaint it to say “all you need is money”? 😂
I took a break from furniture flips in December to work on some projects around my own house that I’ve been wanting to do for the last few years. One of those projects was to make outdoor Christmas yard decorations. I know, I’m kind of late getting a post out about Christmas decor but if you like these, now you have a whole year to plan and make your own!
I’ve seen images online of a Grinch stealing the lights off of the house and decided that was what I wanted to make. I found similar ones for sale on Amazon for $160. I bought a 2′ x 4′ piece of 1/2″ thick plywood at the store for $15 and got to work. I used the image I saw online as a visual guide to sketching my 4′ tall Grinch onto the plywood. If you aren’t good at free-hand drawing I think they do sell patterns for this type of stuff online or you could probably print an enlarged version of the image somehow and trace it onto the plywood.
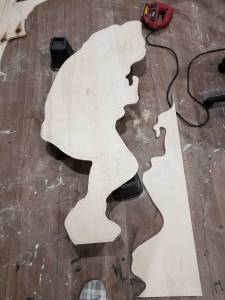

I used my jigsaw with a scroll blade to cut out the shape. I used chalk paint for my design because that’s what I had on hand but I’m sure you could use any type of paint. (Painting the design on is my favorite part!) I outlined everything in black for emphasis. When the paint was completely dry I sealed it with 3 coats of Rustoleum clear spray paint.
At this point, you could attach the cut-out to a metal fence post to place it in the yard. I used a vintage metal gate I had on hand and attached my Grinch to it with plastic pipe strapping and #8 half-inch screws. Then, I just attached the metal gate to my wood fence with some wire. I ran the Christmas lights along the top of the wood fence and then dropped them down to make a few loops that hang from Grinch’s hands so it looks as if he is pulling them off the fence.

I used the same method to make a Snoopy and Woodstock for my front yard! On this one I used two pieces of 4′ x 2′ plywood, to make a 4′ x 4′ square. I attached the two pieces together on the back using a piece of scrap plywood.

With some of the leftover scraps of plywood, I made this crooked Christmas tree to lean over my crooked birdhouse! This one is only about 18″ tall so not quite such a big project!
 My son gave me the unique and crooked birdhouse a few years ago, it was handmade by a friend of his. I have fun incorporating it into my home decor each season and I love the Whoville vibe the leaning tree gives it!
Anywho… that’s what I’ve been up to this month! I hope all of you have had a happy holiday season!
Check back after the first of the year to see what I do with this little art deco nightstand!

